Where should you put these magical tie-backs? The ideal spot is about one-third down from the top of your curtain. Yep, that’s the sweet spot that combines functionality with aesthetic appeal. Stick around, and we’ll get into all the nitty-gritty details you need to make your curtains the star of the show!
How to Measure Where to Put Tie Backs
It’s time to talk numbers. Don’t worry; we’re not diving into calculus; we’re keeping it simple with some essential measurement basics for placing your tie-backs. Get it right, and you’re in for an Instagram-worthy curtain setup!
First thing first: grab a measuring tape and a pencil. Why? Because placement is key. The golden rule is to position your tie back about one-third down from the top of your curtain. So, if your curtain is 90 inches long, you’d place the tie back around the 30-inch mark. Easy, right?
But hey, rules are made to be broken—or at least tweaked. Say you have super tall windows and want to make them look even taller. In that case, consider placing your tie-backs higher up, maybe at the 40- or 45-inch mark, to elongate the look of the window.
On the flip side, maybe you’re all about that cozy, cottagecore vibe. You might place your tie-backs lower, say two-thirds down from the top, to create a more relaxed, billowy effect.
Also, don’t forget to factor in the width of your window. If your window is wider than it is tall, you might want to position your tie-backs closer to the edge to showcase the full glory of your window space.
Alright, there you have it—a straightforward guide to measuring for tie-backs with room for creative flair. Grab that measuring tape, and let’s turn those curtains into a masterpiece!
How to Install Curtain Tie Backs
We’re diving into the nitty-gritty of installing those curtain tie-backs. Don’t sweat it; you don’t need a PhD in Handyman-ology. Just a few simple tools, and you’re good to go. You’ll need a measuring tape, a pencil for marking spots, a drill, and screws. Have you got them? Great, let’s jump in!
1. Above the Window Frame
Let’s zoom in on our first option—installing tie-backs above the window frame. Now, you might be wondering, “Why go high?” Let me break it down for you: placing your tie-backs above the frame can actually give the illusion of higher, loftier windows. It’s like adding heels to your windows; they just stand taller!
So how do you do it? First, get your tools ready. You’ll need that measuring tape, pencil, drill, and screws. Now, decide how far above the window frame you want your tie-backs. A good starting point could be about 6 to 12 inches above the frame.
Let’s walk through an example. Say your window frame is 60 inches from the floor. If you place the tie back 10 inches above that, you’ll mark a spot at 70 inches from the floor. That’s your drilling point! Measure carefully, mark it with your pencil, drill your hole, and secure the tie back with screws. Make sure you do this on both sides, of course.
The result? Your window now has a “lifted” look, almost like it’s reaching for the stars. And let’s not forget, the higher placement means you won’t have to bend or stoop to secure your curtains, making it super convenient. It’s a win-win situation if you ask me!
So, if you’re in the mood to give your space a dash of elegance and the feeling of height, going above the window frame is a stellar choice. Get ready to revel in the sophistication!
2. At Window Frame Level
Now, let’s shift gears and talk about the good old classic: installing tie-backs right at the level of your window frame. This is the equivalent of your go-to little black dress or that reliable pair of jeans. It’s stylish balanced, and works for just about any room.
Why is this such a popular choice? Because it creates an eye-pleasing symmetry. Your curtains get to hang naturally, framing your window like a work of art. Plus, it’s super easy to reach, making it practical for everyday use.
Ready for a step-by-step? Awesome! Grab your measuring tape, pencil, drill, and screws. Now, if your window frame sits at, say, 40 inches from the floor, that’s where you’ll place your tie-backs. It’s as simple as that. Measure 40 inches from the ground, make your pencil marks on both sides of the window, and you’re ready to drill.
After drilling your holes, go ahead and secure the tie-backs with screws. And just like that, you’ve given your curtains a classic, well-balanced look that is perfect for any setting. It’s an elegant choice that shows you know what you’re doing, even if it’s your first time tackling a curtain project!
So, if you’re after a tried-and-true method that offers aesthetic appeal and easy access, setting your tie-backs at the window frame level is the way to go. Trust me, you can’t go wrong with this one!
3. Below the Window Frame
It’s time to dial it down a notch and get cozy with our final option: installing tie-backs below the window frame. Consider this the comfy sweatpants of curtain styling—relaxed, casual, and inviting. This placement creates a billowy look, giving your room a warm, lived-in vibe.
So, why go low? Well, it’s perfect for casual or rustic settings where you want to exude a sense of comfort and ease. Plus, it’s a great option for heavier or longer curtains that naturally cascade to the floor, making them ideal candidates for a lower tie-back position.
Let’s roll up our sleeves and get to work. You’ll need your trusty measuring tape, pencil, drill, and screws as usual. Now, let’s say your window frame is 50 inches above the floor. If you decide to place your tie-backs 10 inches below the frame, you’ll mark spots at 40 inches from the floor on both sides of the window.
Have you got your marks? Great! Time to drill those holes and secure your tie-backs with screws. Now, step back and admire your work. You’ll see curtains with a lovely, draped effect, creating a space that screams, “Come on in and relax!”
So, if you want to make your home feel like the ultimate comfort zone, installing your tie-backs below the window frame is the way to go. You’ll achieve a cozy, informal look that just beckons you to curl up with a good book. Sounds like heaven, doesn’t it?
Tips
Ready to level up your curtain game? You’ve got the basics down, but we’re about to sprinkle in some expert tips that’ll turn you into the curtain whisperer of your neighborhood. So sit tight, and let’s get into it!
1. Experiment Before Drilling
First off, don’t be too hasty with that drill. Try using temporary hooks or some old-fashioned tape to test your tie-back placement. Live with it for a day or two. If it doesn’t feel right, no sweat—you can easily move it without making Swiss cheese out of your walls.
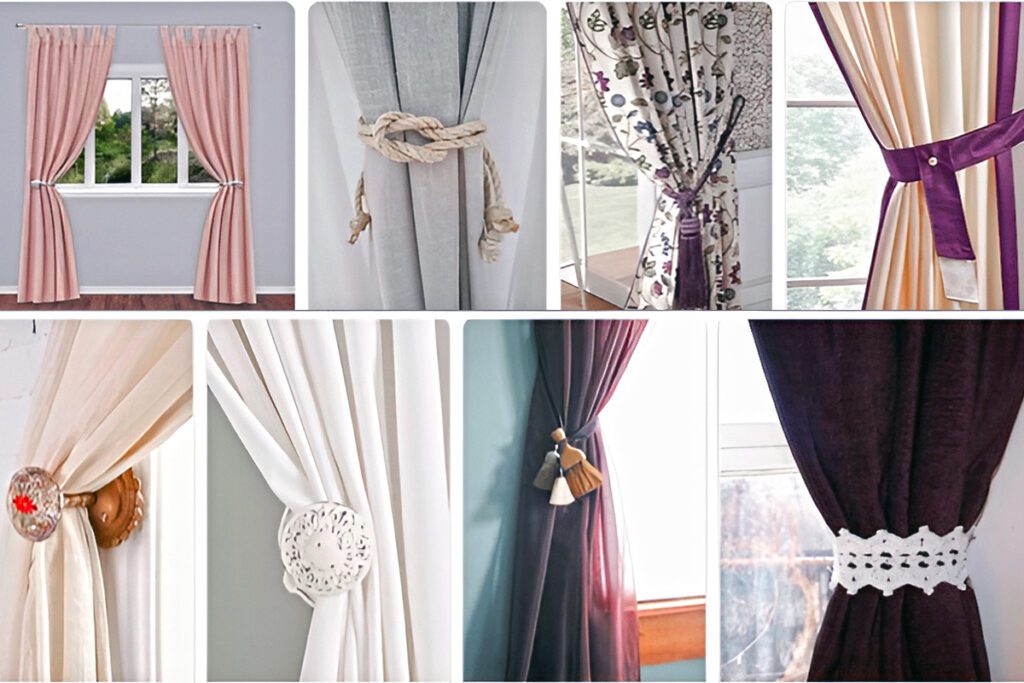
2. Match Materials
Matching the material of your tie back with your curtain can create a harmonious look. Do you have velvet curtains? A plush, velvety tie-back can make it a match made in heaven.
3. Opposites Attract
Don’t be afraid to mix and match, either! A rustic rope tie-back can add charm to modern, sleek curtains. Sometimes, a little contrast can be a good thing.
4. Go Adjustable
Investing in adjustable tie-backs can be a game-changer. These let you change the tightness easily so you can go from a loose, casual look to a tight, formal style in seconds.
5. Anchor Away
Use wall anchors and screws when installing your tie-backs if your curtains are heavy. This will give you that extra hold and peace of mind.
6. Consider Kids and Pets
Are you curious kiddos or playful pets? Place your tie-backs at a height that’s out of their reach. It’s a simple step that can prevent much mischief and mess.
With these pro tips, you can make your curtain dreams come true. Remember, the devil is in the details, and these expert hacks are your ticket to curtain perfection. So unleash your inner designer, and let those curtains shine!


